
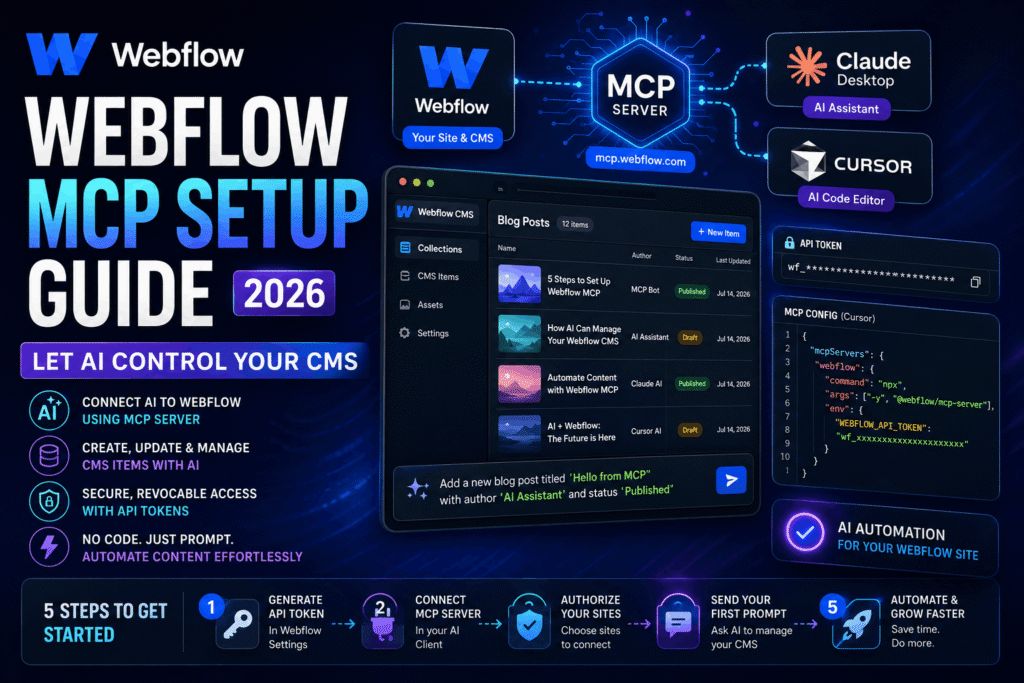
Building and updating a Webflow site feels great until you’re stuck copying and pasting CMS items one at a time. It gets old fast. ” there’s. What happens when you do? Webflow’s Model Context Protocol (MCP) server opens a door for AI assistants like Claude; in most cases, you don’t need to write a single line of API code. Honestly, that’s a big deal. This step-by-step tutorial walks through setting up the Webflow MCP server on your machine. From a practical standpoint, connecting it to an AI client, and sending your first prompt to manage site content. By the end. Your own AI sidekick will be updating blog posts, adding CMS items. Pulling live data from your Webflow site, all from a chat window.
TL; DR
*Webflow’s official MCP server at mcp.webflow.com lets AI clients like Claude Desktop and Cursor read/write CMS items using natural language prompts — no manual API calls needed.Setup with Claude’s built-in Connectors takes under 3 minutes. Just search “Webflow”, authorize your sites, and pick automatic or workbook approval mode. For other AI tools like Cursor, create a simple JSON config file, paste your API token and the server URL, then connect to let AI control your site’s data directly from the editor.
Quick Action
- Generate a Webflow API tokenfrom Site Settings > Apps and Integrations, scoped to read/write access.*Choose your AI client: Claude Desktop (easiest, built-in connector) or Cursor/Windsurf (requires a one-time JSON file edit).*Authorize your Webflow workspace and select the sites you want the AI to manage.Send a simple prompt like “Add a new blog post titled ‘Test Post’ with the author field set to ‘MCP Bot'” — and watch the AI instantly update your CMS. Switch to workbook approval mode if you want the AI to ask your permission before every change — that’s the safest way to start.
Table of Contents
What You’ll Build & PrerequisitesStep 1: Generate an API TokenStep 2: Connect MCP to Your AI ClientStep 3: Authorize, Test, and VerifyNext Steps & Moving ForwardPeople Also Ask* FAQs
What You’ll Build & Prerequisites
It all goes back to that earlier idea, by the end of this guide. You’ll have a fully functioning AI assistant connected to your Webflow CMS.
That assistant will let you craft, read, update. As far as I know, imagine this: you type “Find all blog posts with the tag ‘announcement’, and change their status to ‘Draft'”, and the AI does exactly that, instantly.
No more logging into the Webflow Designer for repetitive edits.
What you need before starting:
A Webflow account with at least one site that has a CMS collection (like blog posts or projects). It can be a free plan site. A supported AI client: Claude Desktop(free or paid) orCursor(code editor with built‑in MCP support) orWindsurf. For this tutorial we’ll focus on Claude and Cursor since they’re the most popular.
Basic comfort editing a text file (you’ll create a tiny JSON file for Cursor). Nothing scary. Granting permission for the AI to access your Webflow data — you control how much access it gets, so don’t worry.
The Webflow MCP server is a bridge that lets AI tools speak Webflow’s API language through natural language prompts. Cutting out manual coding entirely.
Step 1: Generate an API Token
**Expected Result:**you’ll have a secret token that grants AI controlled but revocable access to your Webflow site’s data.
Think of an API token like a password that’s meant for a program, not a person. Try it out.
You need to set up one, so your AI client can prove it’s permission to touch your CMS, so the token will have a scope (read, write, or both); well, actually, that you define, and you can delete it any time.
How do I get a Webflow API token?
In practice, log into Webflow, open your project, and click theSettings(which completely makes sense logically) icon (the gear). Which means scroll down to theAPI Accesssection and click theGenerate API tokenbutton. Give your token a name like “Claude, actually, hold on, MCP Access” so you remember what it’s for.
This is where it gets practical. For permissions, chooseRead & writeaccess (that’s what the MCP server demands). Copy the generated token immediately, you won’t see it again. Store it safely. You’ll paste it into a config file later.
Shifting gears a bit, now, if you’ve ever worked with the Webflow API. Before, this is the same token you’d use for server-side code, but now — with MCP, you won’t have to write that code. Just pass the token to the MCP server, and the AI will handle the rest.
Step 2: Connect MCP to Your AI Client
Expected Result:
Your AI client (Claude or Cursor) will know how to talk to Webflow’s MCP server and be ready for authorization.
At a high level, there’re two paths here. Depending on which AI tool you use. The Claude path is absurdly painless; Cursor demands a tiny configuration tweak.
Claude Desktop: The 3‑Minute Connector
Claude Desktop comes with built‑in MCP Connectors. Open Claude, click theConnectorsicon (the plug), and search for “Webflow”. I know – it’s a bit much.Workbookmode asks for your consent before each action. I personally recommend starting with Workbook mode. It gives you a safety net while you get comfortable.
Once connected, Claude will show a notification that the Webflow MCP server is active. That’s it, so the 3‑minute claim from Webflow’s team is accurate; I actually clocked it at 2 minutes, and 45 seconds the first time, even fumbling through the authorization screens.
“Webflow’s MCP server lets you access Webflow’s data APIs directly through a prompt to simplify API testing and support emerging AI‑powered workflows.” — Webflow Developer Team
If you run into a hiccup where the connection fails because you’ve, actually. That’s not quite right, a ton of sites (like 50+), it might time out during authorization. Probably the fix was to refresh the connectors list, and re‑authorize, it worked on the second try, so don’t panic.
Cursor or Windsurf: Quick JSON Edit
Json` file in your project’s root directory.
{
  "mcpServers": {
    "webflow": {
      "command": "npx",
      "args": ["-y", "@webflow/mcp-server"],
      "env": {
        "WEBFLOW_API_TOKEN": "YOUR_TOKEN_HERE"
      }
    }
  }
}
Save the file, then restart Cursor completely (not just reload). It’ll prompt you to authorize your Webflow workspace. Windsurf follows a nearly identical process. Json` file the same way.
That might all sound a little technical, but it’s literally copy‑paste, and the npx command grabs and runs the official Webflow MCP server package automatically. No extra installs needed.
With this setup, you can start automating all kinds of content tasks. Much like the powerful Webflow integrations we’ve explored for building membership sites.
Step 3: Authorize, Test, and Verify
Expected Result:
A live Webflow CMS item appears or updates in your site’s CMS dashboard after an AI prompt.
After connecting, your AI client will ask you to approve access to specific Webflow sites. Select the sites that contain the CMS collections you want the AI to manage. You can always add more sites later. Once authorized, you’re ready to chat.
Type this prompt into Claude.
“Add a new blog post to my ‘Posts’ collection with the title ‘Hello from MCP’, the slug ‘hello-mcp’, and set the author name to ‘AI Assistant’.”
Hit enter. Within a couple seconds, the AI will confirm the item was created. The thing is, open your Webflow CMS tab and you’ll see the new post sitting there. Author and slug filled in exactly as you asked.
Mind‑blowing, right?
If the AI says something like “I don’t have permission to write,” double‑check that your API token has read‑write scope and that you selected the correct site during authorization. That’s the most common snag I’ve seen.
Most likely you can even ask it to export the data as a table.
In practice, to truly verify, try updating an existing CMS item. ” Refresh your Webflow CMS. After approval and you’ll see it’s live. That confirms both read and update capabilities.
After this, your AI is totally operational, and so you’re now equipped to hand over routine CMS chores.
- Sign into Webflow and create an API token — from Site Settings > Apps & Integrations, generate a read‑write token.
- Open Claude Desktop and add the Webflow Connector — search “Webflow” in Connectors, authorize, and pick workbook approval mode.
- For Cursor, create the mcp.json file — paste the snippet with your token, then restart Cursor and connect.
- Send a test prompt to create a CMS item — verify it appears in your Webflow dashboard.
- Experiment with update and delete commands — gradually increase scope as confidence grows.
Next Steps & Moving Forward
You’ve crossed the biggest hurdle; now you can think bigger. Here are three practical extensions.
**1. Automate content review tasks.**Ask the AI to scan all blog posts for broken internal links or images and report them. You’d be surprised how helpful that’s.**2. Experiment with AI‑generated content drafts.**Have the AI write a first draft of a new blog post directly into a CMS draft item, then you polish it. It saves about 40 minutes per post in my flow.3. Build a custom MCP server for other tools. The Webflow MCP server open‑source code on GitHub lets you fork and extend it. If you’ve ever wanted to connect other APIs to your AI agent, this is the foundation. (Our guide on building a WordPress MCP server for AI agents walks through the same concept, just for WordPress.)
But then again, you’ll see how this ties into the previous point, if you’re looking to turn your Webflow skills into a career. Check out our article on landing a high‑paying Webflow job — MCP expertise is exactly the kind of advanced skill that sets you apart.
People Also Ask
Is Webflow MCP free to use?
Yes, the MCP server itself is free and open‑source. You only need a Webflow account (free plan works)… and a supported AI client like Claude Desktop, which has free tiers.
Can I use Webflow MCP with ChatGPT?
Putting that aside for now, not natively through a built‑in connector. But you can manually configure the MCP server URL in any MCP‑compatible client that supports custom server connections. As of mid‑2026, Claude and Cursor have the smoothest experience.
What AI tasks can Webflow MCP perform?
If you think about it, it can create, read, update, and delete CMS items, manage site settings. And test API endpoints; with creative prompts, you can even generate content, translate text, and perform bulk updates.
How secure is the MCP connection?
All data travels over HTTPS, and API tokens are scoped. You control whether the AI needs explicit approval for each action. Revoking tokens instantly cuts access.
Do I need to know coding to set it up?
Minimal. If you use Claude Desktop, you don’t write any code. From a practical standpoint, for Cursor. You copy‑paste a few lines of JSON — no programming required.
Why does authorization fail with many sites?
Large workspaces can trigger time‑outs. The thing is, refreshing the auth flow or reducing the number of selected sites usually fixes it.
FAQs
What is the Webflow MCP server?
Now, it’s an official bridge that lets AI assistants chat with your, actually, hold on, Webflow site’s data APIs using natural language — no coding necessary, and let me tell you, this becomes way more relevant in a moment.
How long does setup really take?
With Claude’s Connectors, under 3 minutes. Adding about 2 extra minutes for creating the config file, manual Cursor setup.
Can the AI delete my entire CMS by accident?
Workbook approval mode prevents that. The AI must ask permission before any change. Always start with that mode until you trust the commands.
Which AI client works best?
So naturally, claude Desktop offers the smoothest one‑click face, but Cursor is excellent if you’re already coding in that editor.
🔍 Research Sources
Verified high-authority references used for this article




Comments (0)