
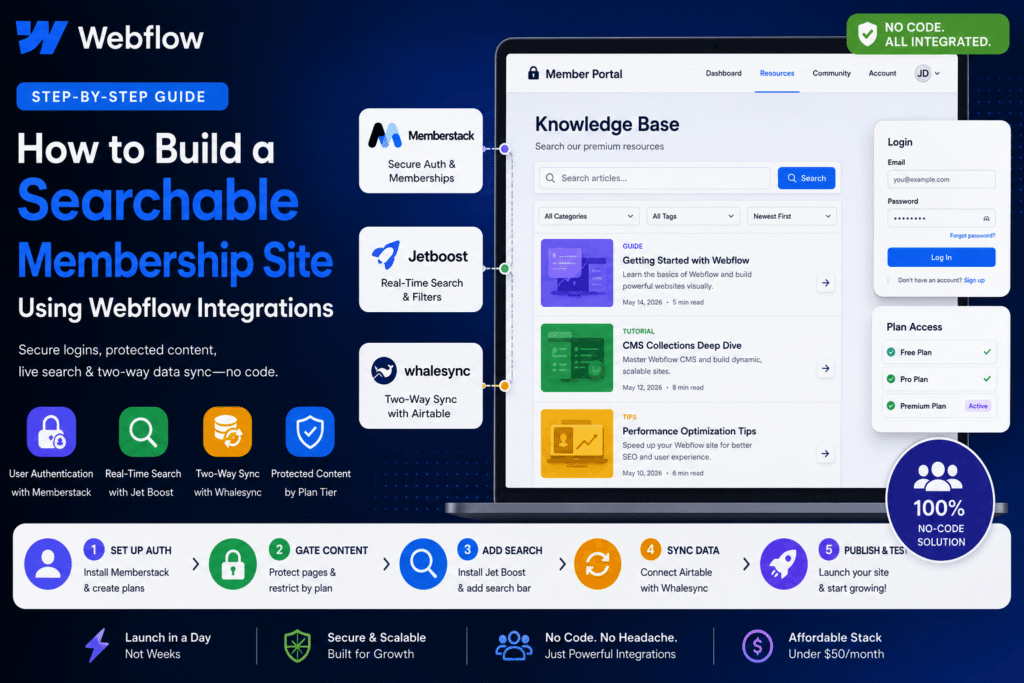
Let’s be honest: building a membership site with protected content — user logins; and snappy live search isn’t trivial. Most developers spend weeks wiring up custom authentication, database queries, and frontend search components, and you’ve probably inherited a messy codebase that breaks every time Webflow updates. That’s the pain we’re solving today.
With a handful of Webflow integrations, Memberstack, Jet Boost, and Whalesync, you. Thinking about it more, can launch a fully functional gated portal in a single afternoon. I know – it’s a bit much.
No custom JavaScript, no database admin. Just native Webflow CMS plus some clever no-code tools.
TL; DR
- Memberstack handles secure user authentication and content gating without a single line of backend code.
- Jet Boost adds real-time search and dynamic filtering to Webflow CMS collections instantly.
- Whalesync provides two-way data sync between Webflow and Airtable, so non-developers can update content safely.
Key Point
- You’ll use Memberstack to authenticate users and gate content by plan tier.
- Jet Boost adds real-time filtering and search across your Webflow CMS collections.
- Whalesync keeps your Airtable database in perfect two-way sync, so non-technical teammates can update content.
- Total cost: roughly $35–$50/month including all tools and Webflow hosting.
- Setup time is around 2 hours if you have a basic Webflow site already built.
Table of Contents
- Project Overview: What You’ll Build and Prerequisites
- Step 1–2: Install Memberstack and Gate Content
- Step 3–4: Configure Jet Boost Search and Filters
- Step 5: Sync Data with Whalesync (Optional)
- Verification & Next Steps
- People Also Ask
Project Overview: What You’ll Build and Prerequisites
By the time you finish this tutorial, you’ll have a Webflow site where registered the majority can log in. Access protected pages based on their membership tier, and search a live directory of the stuff you need (articles, products, or anything stored in your CMS). The whole system runs on no-code integrations. No backend, no custom API calls.
What You’ll Build
- A signup/login flow powered by Memberstack.
- Gated pages that redirect unauthenticated visitors to a login screen.
- A CMS collection (e.g., “Articles”) that users can search and filter in real time via Jet Boost.
- (Optional) Airtable connected through Whalesync so your team can edit content in a spreadsheet.
Prerequisites
- A Webflow account (any paid plan that supports custom code—the Core plan works). If you’re comparing platforms, our fastest WordPress themes guide shows what you’d need on the WP side, but Webflow handles hosting for you.
- A Memberstack account (free tier available).
- A Jet Boost subscription (starts at $19/month as of 2026).
- (Optional) Whalesync account and an Airtable base.
- Basic familiarity with Webflow’s Designer and CMS Collections.
Is this really cheaper than hiring a developer?
Absolutely. A custom membership portal built from scratch constantly costs $5,000–$15,000 and takes 4–8 weeks.
With these integrations, your total annual subscription stays under $600, and you launch in a day. You keep full control. No waiting on freelancers for every update.
Granted, if you need ridiculously complex custom logic. You might still need a developer, but for 90% of use cases, this stack handles it.
Step 1–2: Install Memberstack and Gate Content
Step 1: Set Up Memberstack Authentication
Yet, switching focus for a Also worth noting, work through to the Webflow Designer. Context matters here. Click the “Apps” icon, wait — let me rephrase, (and the data generally agrees) in the left sidebar. It’s a lot to process. ” Search for Memberstack and install it.
The integration will inject a script into your site automatically—no custom code. Once installed, build a “Free” membership plan (or “Basic”) in the Memberstack dashboard inside Webflow. You’ll see fields for plan name, price, and access level.
For this tutorial, keep it free; you could say after saving, Memberstack creates default signup and login embeds that you can drag onto any page from the Add panel.
Worth pausing on that one. Why does that matter? Plus, place them on a dedicated “/login” and “/signup” page.
Expected Result:
Visitors can create an account and log in. The login embed should show a “Dashboard” link after authentication. If it doesn’t appear, double-check the embed settings under Memberstack > Embeds.
Step 2: Create Gated Content Pages
With auth working, you need actual protected pages. ” In the page settings (gear icon), find the Memberstack section. The follow-up question is obvious.
Enable “Need login” and select the “Free” plan. Now, whenever an unauthenticated user tries to visit, they’ll be redirected to your login page. ” This collection will later be searchable via Jet Boost. Not the easiest thing to wrap your head around.
On closer inspection, populate a few dummy items (title, excerpt, category) to test.
Expected Result:
Visiting /member-resources while logged out forces a redirect. After logging in, the page loads and shows the CMS items.
What if my users need different membership tiers?
Memberstack lets you build multiple plans (Bronze, Silver, Gold); after build each plan. Hang on – there’s more. Go to the page restrictions for a resource and select which plans can access it. Stick with me here.
A “Gold” plan might see everything. While “Bronze” only sees introductory content. The UI is direct checkboxes, no coding.
Step 3–4: Configure Jet Boost Search and Filters
Step 3: Install Jet Boost and Build a Search Bar
Open the Apps marketplace in Webflow and add Jet Boost, so where does that leave us? Truly, this integration pairs with your CMS collections to gives live search, no page reloads. What this means is after installation, go to Jet Boost’s dashboard within Webflow.
Where does that leave us? Select your “Articles” collection and mark which fields are searchable.
Usually, you’ll choose “Name” (title) and “Rich Text” (body). You could say according to Jet Boost’s documentation, indexing happens in real time, so any CMS changes appear instantly, drag a “Jet Boost Search Bar” component from the Add panel onto your gated member page. Stick with me here, but does it actually matter?
On the surface, preview the page; type in the search box, and you’ll see items filter as you type. No custom JavaScript.
If you’ve ever struggled with fast WordPress themes requiring complex search plugins. You’ll appreciate how Webflow handles hosting effortlessly, there’s no server setup to worry about.
Expected Result:
The search bar appears on the member page. Enter a term that matches at least one article title; the list updates to show only that item.
Step 4: Customize Filters for Advanced Sorting
Now, jet Boost lets you add dropdown. Or checkbox filters for any Collection field. ” Publish.
It clicks once you see it in action. Users can now combine text search with category selection, so like, type “SEO” and filter by category “Guides”—only matching articles appear.
Here’s something to consider: this is how larger directories like job boards work, and you built it in about 15 minutes.
Expected Result:
Selecting a category from the dropdown filters the displayed CMS items. Combining search text and a filter narrows results correctly.
Step 5: Sync Data with Whalesync (Optional)
If your team prefers managing content in spreadsheets (and honestly. Probably industry data from Whalesync shows its two-way sync eliminates manual data entry. When content lives in both places. ). Then, in Whalesync, connect both endpoints, map the fields, and turn on auto-sync. Now, when your content team adds a new article in Airtable, it appears live on the member portal within seconds, so the reverse also works, Webflow CMS changes push back to Airtable.
Most people feel the same way about it. This keeps everyone working in their comfort zone. For teams that earlier tried headless WordPress setups for similar flexibility, you’ll find Whalesync far less maintenance-heavy.
Expected Result: Add a new row in your linked Airtable base, refresh the member page; the new article shows up in the CMS list and is searchable through Jet Boost.
Verification & Next Steps
Now, visit your live site and run through this checklist:
- Open the login page (/login), create a new account, and log in.
- Navigate to the gated member page. You should see the CMS collection list.
- Type a search term in the Jet Boost bar—results filter instantly.
- Use a category filter and confirm it narrows results.
- (If using Whalesync) Add a test record in Airtable; confirm it appears on the site.
If any of these fail. Revisit the corresponding step and check the “Expected Result” details.
What’s next?
- Add paid membership tiers using Memberstack’s pricing settings. Connect Stripe to charge users.
- Enhance the search with Jet Boost’s sorting options (by date, popularity, etc.).
- Explore other Webflow integrations like OneTrust for cookie consent compliance or Marketo forms for marketing automation—both available in the Webflow marketplace as of early 2026.
For design consistency across larger projects, you might look at how Wix Harmony enforces unified styling automatically, but Webflow’s class system gives you more granular control.
- Install Memberstack — Set up at least one membership plan and embed the login form.
- Create a gated page — Restrict access to a CMS collection page.
- Add Jet Boost — Connect your collection and drag in a search bar.
- Configure filters — Add dropdown filters for categories or other fields.
- Optionally sync with Whalesync — Connect Airtable and enable two-way sync.
- Publish and test — Run through the verification checklist above.
People Also Ask
Can I use these integrations without any coding experience?
On average, memberstack, Jet Boost, and Whalesync are all no-code platforms with visual interfaces inside Webflow. You drag components onto pages and toggle settings. No JavaScript or SQL needed.
What if I need to integrate a payment gateway for paid memberships?
Which means users will be charged automatically upon signup. And gating works based on plan status.
Does Jet Boost slow down my Webflow site?
Not noticeably. Consider this: jet Boost uses client-side indexing. And renders results without page reloads. Sites with thousands of CMS items might see a slight delay, but for most portfolios or resource directories, performance remains fast — hold onto this thought.
Is Whalesync necessary if I already update content inside Webflow?
No, whalesync is optional. If your entire team works comfortably inside Webflow’s Editor. Whalesync shines when non-technical stakeholders prefer Airtable or when content is imported from external databases.
Are these integrations safe for enterprise use?
Yes, exactly right. Webflow offers real-time collaboration on all plans. And the platform has migrated to a next-gen CMS architecture with improved security. Memberstack and Jet Boost both follow industry-standard encryption.
The Webflow marketplace also includes compliance tools like OneTrust for cookie consent.
How much does all this cost in total?
As of 2026, a Webflow Core plan costs $29/month, Memberstack free tier covers basic auth. And the trend keeps going. Jet Boost starts at $19/month, and Whalesync’s basic plan (depending entirely on the context) is around $39/month. Total monthly cost is under $90 for a fully operational membership site with live search and data sync.
🔍 Research Sources
Verified high-authority references used for this article




Comments (0)